Ok - so everyone loves BACON, right?! I mean, seriously, I could NEVER become a vegetarian or a vegan, but to each your own! The closest I would become and which my husband, Jason, and I are currently trying to work on is becoming a Flexitarian! Yes, that's right...flexitarian. People who have very little meat...but lean more towards the veggies that are SO good for your body and mind and fruits...but who can give up Bacon?! Jason and I love cooking shows and we came across this place in Portland, Oregon called Voodoo Donuts who combined bacon with donuts! What an amazing concept, right? My husband is not very much a "sweets" man, but would prefer having chips over candy. He loves those sweet and salty granola bars. I even have to have something salty to take the sweet out of my mouth so I don't keep eating more chocolate because I LOVE sweets! I really have to watch myself...so for our new flexitarian life we are taking on we do like to indulge in a little bit of amazingness every once in awhile. My husband is the bacon man and I am the sweets girl who loves her french toast! And who doesn't love waffles with bacon?! So when we came across a recipe for these cupcakes; I just HAD to make them and share it with all you wonderful people! So here ya go - enjoy - and make sure you set out at least 2-3 hours to make these because EVERYTHING is from scratch and it does take awhile to make, but well worth it! Your family and friends will be AMAZED! It is a GREAT brunch treat/idea!
The recipe:
French Toast Cupcakes What You’ll Need:
- 3/4 cup unsalted butter (1 1/2 sticks), at room temperature
- 1 cup sugar
- 1 1/2 cups cake flour, sifted
- 1 1/2 teaspoons baking powder
- 1/4 teaspoon fine salt
- 1/2 cup milk, at room temperature
- 1 ½ teaspoon vanilla extract
- 1 teaspoon fresh grated nutmeg
- 1 teaspoon cinnamon
- 3 large eggs, at room temperature, separated
- Maple Buttercream Frosting, recipe below
- Crisp Bacon
- Equipment: A six cup jumbo muffin pan or 12 cup regular muffin pan
Directions:
1.) Place a rack in the middle of the oven and preheat to 375 degrees F. I like using the foil cupcake liners best, paper tends to stick too much and I still spray them down with Pam butter spray.
2.) You can use a standing mixer fitted with the paddle attachment (which I LOVE mine and it's easier to use) or you can use a regular mixer (but sometimes you have only so many hands and it makes pouring things in and mixing a little bit more complicated, but you have to do and use what you have!), combine the butter and sugar and mix on low speed until just combined. Raise the speed to high and mix until light and fluffy, about 10 minutes. (Occasionally turn the mixer off, and scrape the sides of the bowl down with a rubber spatula.)
3.) Meanwhile, in a medium bowl, whisk together the flour, baking powder, salt, nutmeg, and cinnamon. Set aside. In a small bowl, whisk together the milk and vanilla, and also set aside.
4.) Add the egg yolks to the creamed butter one at time, waiting for each one to be fully incorporated before adding the next.
5.) Reduce the speed of the mixer to low. Alternately, add the flour mixture in 3 additions and the milk in 2 additions, waiting for each to be fully incorporated before adding the next (scrape the bowl down occasionally). Raise the speed to medium and mix briefly until a smooth batter is formed. Transfer the batter to a large bowl.
6.) Thoroughly clean the bowl of the mixer and put the egg whites inside. Whip the egg whites on high speed, using the whisk attachment, until stiff peaks are formed. (This always amazes me.)
7.) Working in 3 batches, using a rubber spatula, fold the egg whites into the batter, until just incorporated. (This makes the cupcakes SO fluffy and wonderful!) Divide the batter evenly among the cups in the muffin pan. Bake, rotating the pan once, until golden brown and a toothpick inserted in the center of the cakes comes out clean, about 25-30 minutes, depending on your oven (you know everyone's is different! so keep a careful eye on them)
8.) Remove the cupcakes from the oven and cool completely while you make your frosting!
Then you must create some BACON!
Crisp Bacon
Bacon works well for me baked in an oven at 425 degrees on a baking sheet lined with parchment paper. Bake about 8 strips of bacon for 15 minutes, drain grease, and bake another 5-7 minutes, if needed or until crisp. You can do it in a pan, if you prefer. Once complete, set the bacon out and let it completely cool before crumbling into little bits for your frosting! While this bacon is cooling, cook another 12-24 strips of bacon, depending on how many cupcakes you made and leave these whole. These bacon strips are to top off your cupcakes!
Maple Buttercream Frosting
Yield: about 1 2/3 cups, enough for 6 large or 12 regular cupcakes
What You’ll Need:
- 2 Sticks unsalted butter, at room temperature
- 2 3/4 cups confectioners’ sugar
- 2 teaspoons heavy cream, at room temperature
- 3/4 teaspoon maple extract
Directions:
1.) In a standing mixer fitted with the paddle attachment, or with a hand-held electric mixer in a large bowl, mix the butter and sugar on low speed until incorporated. Increase the speed to high, and mix until light and fluffy, about 3-5 minutes. (Occasionally turn the mixer off, and scrape the down the sides of the bowl with a rubber spatula.)
2.) Reduce the speed of the mixer to low. Add the heavy cream and maple extract. Raise the speed to high and mix briefly until fluffy (scrape down the bowl occasionally). Store in the refrigerator until somewhat stiff, before using about 3 minutes. Take frosting out of refrigerator and mix in the already made crumbled bacon and set aside.
*(IF you plan on making the frosting ahead of time, do NOT make and put in the crumbled bacon before hand because it will get soggy and not taste as good. Frosting may be stored in the refrigerator for 3 days and when you are ready to use it, let it set out until it's soft enough to incorporate fresh made crumbled bacon!)
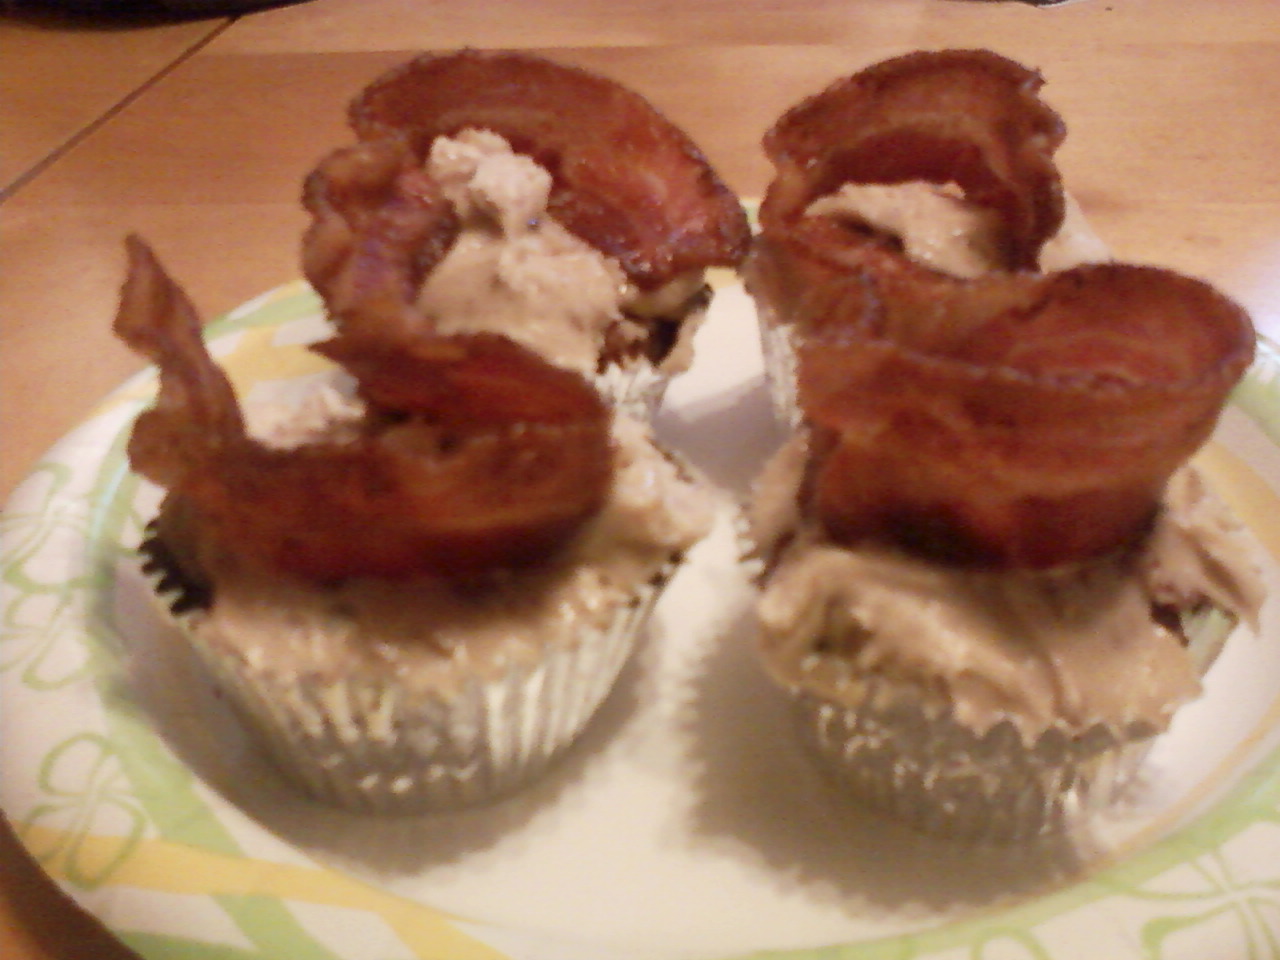
Finally – Frost the cooled French Toast Cupcakes with the Maple Buttercream Frosting and top with a Crisp piece of Bacon!
Your creation should look like this:

~Made by: Holly


 3. With you finger dab into water and wet 2 edges of Wonton Wrapper;


.jpg)


