Thursday, July 21, 2011

Fried Rice


As my grandmother would ask me daily when I lived with her while going to college, "Got any drothers?"  The first time she said that I was like, "Huh?!"  She laughed so hard.  So yes, drothers...We had a craving for fried rice one night...and when your favorite Chinese restaurant doesn't deliver, you have to get creative.  So I said, "It can't be that hard."  And it wasn't! Not only is it a super simple recipe, but it doesn't take long to cook.  There are SO many different things you can add to fried rice, but I wanted to keep it simple.  I didn't want any meat in it and I didn't want a lot of different vegetables. But you can dump whatever you have drothers for the most ;p Most fried rice recipes call for sesame oil, but I don't like the way it taste if used alone.  However, in most Asian dipping sauces for their steamed dumplings a small portion is included (which I had some sauce left over that I used).  If you don't have any leftover dumpling sauce, I included the recipe below so you can make your own!  I wasn't quite sure if I'd like the fish oil in this, but it actually made it taste really good.  If you do decide to add the fish oil, be careful not to add too much because it does have a tendency to taste "fishy".  I think I liked my version better than the restaurant!   So, I will share my genius creation with all of you & hope you have the supplies in your pantry too.  Enjoy!

Ingredients:

Brown Rice (use package directions for serving size, I use the 4 people serving size)
2 Eggs
Frozen Peas
Light Low-Sodium Soy Sauce
Green Onions
2 Garlic Cloves, finely chopped
Canola Oil
Fish Sauce (hard to find in regular grocery - I got it at our International Farmer's Market)

**For a little extra taste to bring out flavors you can add fresh lime juice & white pepper to taste.  I didn't have those ingredients, but I heard that was good too.  (More along the lines of a Thai version)


Asian Dipping Sauce Ingredients if you don't have leftovers from dumplings :)
1/2 cup soy sauce
1 tbs. sesame oil
1 tbs. minced scallions
1 tsp. minced garlic

OK, before we start, here are a few tricks I've learned over the years for making great fried rice. Number 1:  A wok - it is the best tool for fried rice. If you don't, it can be tricky but still manageable.  Number 2: If you are going to use a wok - High heat - you want it as hot as possible. If you don't have a wok - use the largest skillet you have and also use high heat.  Only stir as much as necessary and be gentle with the rice. Too many stirs may break the rice and turn it into mushy fried rice. Number 3: I think there's plenty of salt/sodium in soy-sauce, so you don't need anymore.  Don't give yourself a heart attack!  High sodium is bad people.  Number 4: VERY important key to making good fried rice - start with cold rice.  So if you are not using leftover rice and making it fresh, put it in your refrigerator till it's completely cooled off.  Ok now, let's make it!

Make It:

First cook brown rice per package directions.  When it's complete, stick it in the fridge to cool.  Make sure you toss your rice & break apart to let all the steam out and it will cool down faster in your fridge. 

Next, make your fried egg.  Scramble the 2 eggs and pour it into your hot skillet and shake it till it looks like it's making one big pancake.  Wait till it's fully cooked through & flip it.  When complete, slide it off onto a cutting board and wait for it to cool.

In the meantime, cut up green onions & garlic and set it aside.

Your egg is probably cooled down enough by now.  Cut long strips of egg and roll up the strips, then slice the rolled up egg, and repeat.  You will have a bunch of little strips of egg. Set this aside.

Next, make your dumpling dipping sauce if you don't have any.

Your brown rice is probably cool enough by now. Remove it from fridge.  Heat up oil in skillet on highest heat.  Toss in your brown rice, it should sizzle.  Drizzle a little more oil on top of rice and toss around to make sure it's all covered nicely. Don't use too much oil. You want just enough so the oil is crisping up your rice.

Then put a splash or two of soy sauce (however much you would like) I covered it enough so the rice was really browned.  I didn't measure.  Then add your dumpling dipping sauce, fish oil (a couple of splashes) and garlic.  You can toss in some white pepper at this time, if you wish to use some.

Remember - TASTE your rice, if you need more sauce or want to add any other seasonings that you think might be good - go for it.  Play around with it.  That's what I do.

Next, add your egg.

Then add your frozen peas at the end.  They will cook as you toss them in the rice.

After about 2 minutes on the high heat, it should be done! Remove from heat and toss in your green onion.  You want to do this last so you can have that extra crunch in there.

Oh- and if you want to do the whole lime thing.  Roll your lime around on the counter to get the juices flowing.  Cut it open and squeeze over the rice and toss.  Or add lime wedges to the plates & let whomever you are serving do it themselves.  I'm definitely doing this next time.  I LOVE lime!

~Viola!

Jason requested to make chicken livers on the side, so I made Thai Chicken Livers.  If anyone wants that recipe, just send me a request and I'll put it up.  They turned out amazing!  Here's a picture of it plated.

Thai Chicken Livers and Fried Rice:


Created by: Holly

Wednesday, July 20, 2011

Filo-Wrapped Asparagus

So I thought this recipe looked interesting enough to try and I'll probably make it again.  Nice light afternoon snack or appetizer to a meal.  I liked the thin crunch of filo dough and if you like asparagus - you'll love this treat!  I wasn't too sure about the dip at first.  I thought the ingredients were kind of strange.  I would have never thought of putting it together.  However, it was a very pleasant surprise to my taste buds and a must to have along with the asparagus.  Enjoy :D

***Quick tip: If you decide to make these ahead of time or have any leftovers, reheat in the oven or a toaster over so the filo gets crisp again.  Reheat for 3 mins. at most, otherwise they will overcook & not be good.  Also, the dip is only good the day you make it.  It can not be made ahead. I learned that mistake. :-/

Serves 4

Ingredients for the dip:

1/2 cup of natural cottage cheese
1 Tbsp. of low-fat organic milk
4 scallions, trimmed and finely chopped
2 Tbsp. of chopped fresh mixed herbs: basil, sweet mint & tarragon
Pepper

Ingredients for the asparagus:

20 Asparagus spears*
5 sheets of filo dough (plenty in 1 box; usually found in freezer section with desserts)

Make it:

Preheat over to 375 degrees

Make your dip first by combining the cottage cheese in a bowl and adding the milk.
Beat until smooth then stir in the scallions, chopped herbs, and pepper to taste.
Place the serving bowl, covered lightly in the refrigerator to chill until ready to serve.

Snap off ends of the asparagus where they naturally snap - this gives the best taste of the asparagus.
With a vegetable peeler, shave off any woody parts from the spears.

Cut the filo dough into quarters and place one sheet on a clean cutting board.
Brush filo lightly with water (NOT too much or it won't be workable).
Place one spear at one end and roll up.
Place each rolled asparagus on a large baking sheet.
You may want to lightly spray non-stick.

Bake for 10-12 minutes (I did 11 minutes and they were PERFECT), but every oven varies.
Or bake until the pastry is golden.
Serve with dip on the side.

*My grandmother taught me a cool trick when I lived with her when I was attending college in AR that I thought I'd share with all of you.  I had never heard this before she told me about it. You should wash your asparagus when you get it home, then place them in a large glass wide enough so they're loosely fitting and fill the glass halfway with water, and place them in your fridge. They will keep longer than just throwing them in the vegetable drawer.  I've never met anyone who could eat a whole bundle at one time, unless you were cooking for a party! And you can cook a couple at a time whenever you want to cook asparagus with a meal.  Works great when you're cooking for just yourself or for 2.

Holly's Cheesy Vegetarian Lasagna

Ingredients:
(I got all my ingredients from our local Farmer's Market.  Nothing like FRESH veggies :)

Your favorite Mushrooms; 1pkg.
3-4 Fresh Garlic Bulbs; finely chopped
1 large Vidalia Onion; finely chopped
1 large Red Pepper; diced
3 Medium Zucchini; diced
4 Vine Tomatoes; diced
1 whole Broccoli; chop tree tops off & in half if too big (want them bite size)
1 1/2 Leeks; chopped & halved
8 oz Baby Spinach; can use fresh or frozen; I prefer fresh
1 Tbsp. Lemon Juice
1 Box No Boil Lasagna Noodles
1/2 cup All Purpose Flour
3 cups Milk
2 Tbsp. Butter
15 oz. Ricotta Cheese
24 oz. Cottage Cheese
1/2 cup Fresh Shredded Parmesan Cheese
BIG bag shredded Mozzarella Cheese
Extra Virgin Olive Oil
Italian Seasoning
salt & pepper to taste

Make It:

Heat oil in large skillet.
Add onions & red pepper; cook about 5 minutes.
Add zucchini & broccoli; cook another 5 minutes or until soft.
Add tomato & leeks; season with Italian Seasoning; stir frequently; cook roughly 7-8 minutes.
Set aside

Separate skillet - heat oil; add mushrooms & garlic; cook for 3-5 minutes.
Add lemon juice & season with salt & pepper.
Cook until almost all the liquid has evaporated. (approx. 5 minutes)
Set aside

In saucepan over medium heat, put milk & whisk in flour, add butter.
Cook 5 minutes, till thick, stirring constantly.
Stir in parmesan cheese & season with salt and pepper.
Cook 1 minute; stir constantly.
Remove from heat; stir in spinach.

In a small bowl, combine ricotta and cottage cheese

Lightly grease deep dish casserole dish.

Layer your lasagna:

1-Start with spreading a thin layer of spinach cheese sauce on bottom,
2-No boil lasagna noodles (I use 8 noodles per layer)
3-Ricotta & cottage cheese mixture,
4-All veggies combined mixture,
5-Top with spinach cheese sauce,
6-Shredded mozzarella cheese

And repeat.

Bake at 350 degrees for 35 minutes.
VIOLA!

 ALOT of prep work and love went into these veggies! ;p

It's been awhile...

Hi all,

Josh and I have had A LOT going on in both of our lives these past 6 months and hope you all haven't given up on us.  Still cooking...still eating...still creating...when we can!  

As Josh, I too have taken on a very little meat diet...actually pretty much have gone vegetarian 90% of the time.  I don't think I could ever give up cheese, my greek yogurt, and I like an egg every once in awhile so I guess I kind of fall into the Lacto-ova-vegetarian category.  I recently picked up this new Vegetarian cookbook and am LOVING it!  I hope you will enjoy a few of my favorites from the book that I've put my own twist on the recipes.

I hope to get back to creating more for myself and everyone as well as Josh get back on and give us some more of his creations.

So to start us back out again - I have my very own first vegetable lasagna baking in the oven as we speak.  I will go ahead and post the recipe and a picture will follow when it's complete!

Take care...and happy eating.

Sunday, January 16, 2011

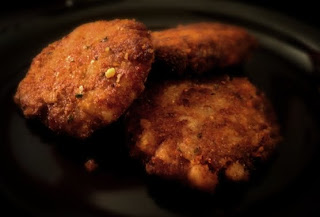
Crispy Tuna Cakes

But Josh? Meat? And fried? Yes!! These are by far the best tuna cakes I have ever had! And a very surprising ingredient turns into a very cheese like texture. Potato! Kids and adults alike will love these crispy dinner treats! Makes 8 cakes.

Ingredients:

1/2 Can New Potatoes (Cubed)
1 Can Tuna (Drained)
1 Cup Bread Crumbs
3/4 TSP Garlic Powder
1/2 TSP Parsley Flakes
1/8 TSP Ground Red Pepper
2 TSP Mustard
1 1/2 TSP Olive Oil


Boil cubed potatoes until soft, then mash leaving very small chunks. Heat large skillet with 1/2 inch of oil over medium heat. Empty drained tuna into medium bowl, flake with fork. Combine mashed potatoes, 3/4 cup of bread crumbs and all other ingredients into tuna and stir with fork until evenly combined. Form patties out of approx. 1/4 cup of mixture. Pour remaining 1/4 cup of breadcrumbs on plate. Lay patties flat onto breadcrumbs lightly coating each side. Drop into oil. Flip once 3-4 min in until crispy and brown on both sides. Let stand on newspaper or paper towels for 5 minutes before serving.

Read up. Eat up. Enjoy!
- Joshua

Crispy Garlic Crackers

The crackers are to die for! And are so much better for you than any of the flavored crackers you would buy at the grocery store. They are so good you will want to keep the recipe for when you have people over and just want a quick snack to serve with a homemade dip!

Crispy Garlic Cracker Ingredients:

1 Cup All Purpose Flour
4 TBSP Olive Oil
1/4 Cup Warm Water
1/8 TBSP Ground Red Pepper
1/2 TBSP Garlic Powder
2 TBSP Parsley Flakes
1 TBSP Sea Salt

Preheat oven to 400. Combine all ingredients in a medium bowl. Using one hand mix ingredients and kneed until you have a ball of dough. If it feels a bit thin you can add small amounts of flour by hand until ball is formed. Spray cookie sheet with cooking spray. Place dough in center of tray. Flatten, using hands to press from the inside out until dough is very thin. Lightly spray top of dough with oil and sprinkle with salt. Using a pizza cutter or sharp knife cut dough into one inch squares. Bake for 10-12 minutes or until golden brown. Let stand for 5 minutes. Crackers will crisp as they stand.

Read up. Eat up. Enjoy!
- Joshua

Kickin' Three Bean Soup

You are going to love this soup! It is so cheap to make, and so very good for you. High in protein and vitamins! Also, if you are like me and enjoy spicy foods this recipe is great! If you prefer to keep your food on the spice free side, leave out the hot sauce and cut the Ground Red Pepper measurement in half!

Be sure to check out the Crisp Garlic Cracker recipe for an amazing topper to this soup!


Ingredients:

1 Can Garbanzo Beans
1 Can Black Beans
1 Can Kidney Beans
1 Small Yellow Onion Chopped
3 TBSP Olive Oil
1 TBSP Ground Red Pepper
1 TBSP Garlic Powder
1 TBSP Parsley Flakes
2 Cups Tomato Juice
1 Cup Hot Sauce
6 Cups Water

In a large pot combine chopped onion and olive oil. Toss so that the onion is completely covered in the oil. Cook on medium heat until onion has cooked down and is browning.

Empty canned Garbanzo, Black and Kidney beans into a strainer and rinse.*

Combine water, beans, ground red pepper, garlic powder, parsley flakes, tomato juice, and hot sauce into the onions. Bring to a boil. Reduce heat and simmer for 30 minutes. Serve topped with crackers.

Read up. Eat up. Enjoy!
- Joshua


*One rule to always follow when working with canned beans. Rinse them! It cuts out half of the sodium, and in most cases eliminates the gas causing ingredients!


Hello readers and eaters!

I am the guy (Joshua) that is supposed to be helping Holly with this food blog. And I have been so busy working that I have not yet had a chance to post anything. So I am going to post a few different things all at once!

I am currently on a very minimal meat eating diet. Most of the food I am going to post right now is going to be meet free. But, you can add meat to any of it. Also, I rarely eat fried foods or deserts. Yeah I know... I am the boring eater of the two! But I promise you! This food will not be missing taste!

Read up. Eat Up. Enjoy!

- Joshua

Sunday, December 12, 2010

Nutella Wontons

OK, so who doesn't need a sweet indulgence every once in awhile? And who wouldn't love something that taste like a light chocolate chip cookie? Maybe chocolate haters, but I'm not one of those and hopefully you aren't either because these are just heaven! I've just discovered how amazing Nutella taste. For those of you who haven't had the pleasant experience of tasting it, Nutella is a hazelnut spread that taste just like chocolate. Most grocery stores have all the ingredients you will need to make this little treat, but you may need to go to a place that carries Organic items to find the wonton wrappers for you small town peoples. I usually had a hard time finding certain items when I lived in Arkansas. OK, so here it is - Nutella Wontons. The best thing about this recipe? You can make as many or as little as you want. Super easy and super fast to make.


Ingredients:
Wonton Wrappers
Nutella
Small Glass Water
Canola Oil
Powdered Sugar
Make It:

1. Take Wonton Wrapper, place on plate;
2. Place small spoonful of Nutella in center of Wonton Wrapper;

3. With you finger dab into water and wet 2 edges of Wonton Wrapper;

4. Fold Wonton Wrapper over (into triangle shape); the water side will seal the edges together;
5. Place Nutella Wontons in preheated hot skillet of 1 inch Canola Oil; cook 1-2 mins. each side over medium heat or until golden brown;
6. Drain on paper towels;


7. Sprinkle with powdered sugar; serve while hot

*I've been thinking about what else might be good in these wrappers because it's just so simple and easy to make, either as a dessert or an appetizer. Maybe Nutella and Strawberry Jam? Or Peaches? You can always do crab rangoons?...Which I would do crab meat, drained, chopped and combine with cream cheese, steak sauce, and garlic powder; place 1 tsp. in wrapper, egg yolk edges to seal and deep fry in hot oil until golden brown. Yes, I know how to make those :D Now go buy some Wonton Wrappers and get creative!
~Made by: Holly

Friday, November 26, 2010

Leftovers!

We hope everyone had a wonderful Thanksgiving with family & friends and found something to be thankful for!


XO,
Holly

Turkey Time!

What an AMAZING turkey turn out! This was mine and Jason's very first turkey we both cooked and it was a huge success. It had a really great golden brown crispy skin with the juiciest meat! The flavors from the seasoning went throughout the entire turkey. I HIGHLY recommend slow roasting. Here's what you need below to get started and I'll walk you through the whole process! We used an 11 lb turkey for our group of 7 yesterday.

*First, the night before Thanksgiving, we brinned our turkey. We used a HUGE pot. Place 3 gallons of cold water, 2 cups Kosher salt, 1 cup sugar, 4-5 Thyme sprigs (whole), handful whole peppercorns, several garlic cloves (halved with skin); stir to make sure salt and sugar dissolve. Place turkey in water, cover, and let sit overnight. Do not exceed 12 hours. (We did ours for roughly 9 hours). Doing this will help keep meat moist during cooking, along with another step you will see below. (Don't forget to take the neck and giblets out of the carcass.


Start by preheating your oven to 475 degrees and get the following together:


Roasting Rack


Washed and dice celery and carrots;
Quarter chopped sweet onions;
Placed under turkey rack to mix with drippings!


Room temp. stick of salted butter;
Fresh Thyme & Sage;
Garlic Powder;
Oregano;
Mash together in butter


Separate skin from meat without tearing;
Gently go as far as your hand will fit;
May need to gently slice cartilage with knife to get it started.


Take a big "gob" of butter mixture onto fork and place between the skin and meat. Then take your finger and spread butter underneath by pressing top of skin and "smooshing" the butter towards the neck. Don't worry if you can't get the butter close to neck or all the way down the breast of the bird because during cooking it will melt down throughout the bird. Doing this will also help keep your meat extra moist and not to dry out!


Place your turkey on the roasting rack above the vegetables. Generously sprinkle bird with pepper. (Since we used salted butter instead of unsalted, we didn't put extra salt on the outside). Doing this will help "crisp" up the skin. Once done and your oven is preheated to 475 degrees, place turkey in oven an cook for 20 minutes only. Yep, 20 minutes. This will "seal" the turkey's moisture and you won't have to bast it for the remaining cooking process - no joke.


Take turkey out of oven after 1st 20 mins;
The string you see here is not "trussing" it;
This string came with the turkey and helped with lifting it off the rack onto a plate when it was finished.


See how the very tips of the wings got really brown?
I covered just the tips with a little foil for the remaining cooking time.

While bird is resting, lower oven to 250 degrees.
You want to slow cook your bird so it doesn't cook to fast because this will dry it out.

Your turkey should start looking golden brown like this after the first 20 minutes on high temperature.


When oven is at 250 degrees, put turkey back in and cook for about 3 hours, 40 mins. (for 11 lb) or until breast reads 170 degrees, thighs read 180 degrees and juices run clear. Here's times for other lbs. Regardless of pounds - make sure internal temperate is at these degrees.

10 lbs - 3 hours. 20 mins.
12 lbs - 4 hours
13 lbs - 4 hours 20 mins.
14 lbs - 4 hours 40 mins.
15 lbs - 5 hours
16 lbs - 5 hours 20 mins.
17 lbs - 5 hours 40 mins.
18 lbs - 6 hours
19 lbs - 6 hours 20 mins.
20 lbs - 6 hours 40 mins.

Once complete, lift turkey out of roasting pan and place on platter. (We forgot a big turkey platter at home, so we had to use the biggest plate we could find.) Start carving by taking the legs off first, then starting in the middle of the bird, at the top, slice the breast thin.


Hope you enjoy as much as we enjoyed making this turkey!


~Made by: Holly & Jason

Roasted Veggies

At Thanksgiving, people always seem to have too many starches and not enough veggies...so I made some roasted vegatables to make me feel a little better about not being healthy on this holiday. I thought I had a big enough pan for all of them, but I ended up having to divide them into 2 separate dishes. And when I'm packing everything up in the car yesterday, I noticed I forgot to put my pearl onions in the mix! Oh well. Here's what I did:

Ingredients:
1 lb Zuchinni
1 lb Yellow Squash
1 lb Broccoli Florets
1 Red Bell Pepper
3 Shallots
Extra Virgin Olive Oil
Salt
Pepper

Make it:
Preheat oven to 400 degrees;
Wash all veggies;
Chop/slice zuchinni, squash, shallots in quarter sizes; place in casserole dish;
Slice red pepper in thin strips, place in casserole dish with broccoli;
Sprinkle salt and pepper over all veggies;
Drizzle EVOO over all veggies and toss;
Bake in oven for 10 minutes;
Remove and toss again;
Bake additional 20 minutes;

Voila!
~Made by: Holly


Potatoes Au Gratin


Jason really wanted to make some type of scalloped/potatoes au gratin this Thanksgiving. They turned out really good. However, he realized he forgot to get some green onions from the store to put into it and garnish it with, but it's included in the recipe below and we think would really add to this dish!

Ingredients:
2 cups heavy whipping cream
1 cup gruyère cheese, shredded
4 sprigs of Thyme, off stem, chopped
Salt & Pepper, to taste
2 cloves fresh garlic, chopped
3 Tbsp. chives, in mixture, some for garnish
2 lbs. Russet Potatoes, sliced thin
1-1/2 cup Parmesan Cheese


Make It:
Preheat oven to 375 degrees

Wash, peel, and slice potatoes thin;

Combine all ingredients in bowl, mix well;

Pour mixture into casserole dish and flatten in dish with spatula;

Sprinkle 1/2 cup shredded Parmesan cheese on top (also garnish with some green onions)

Bake for 40 minutes or until golden brown and bubbly and potatoes are tender.

Enjoy!
~Made by: Jason

Thursday, November 25, 2010

Deviled Eggs

Gotta have some deviled eggs to snack on while you are creating your Thanksgiving feast.
Here's the typical recipe:

Ingredients:
12 eggs, hard boiled
4 Tbsp. Mayo
2 Tsp. Spicy brown mustard
2 Tsp. Sweet pickle relish
Salt, to taste
Pepper, to taste
Paprika, for looks

Make It:

1~ Boil dozen eggs in water for 12 minutes; cool in fridge; crack shells, peel, rinse off.
2~ Cut hard boiled eggs in half & separate yolk; turn egg over and yolk will fall out into bowl; place whites onto separate plate; repeat for all eggs.
3~ Add mayo, mustard, relish, salt & pepper to taste to yolk & mash all together until creamy and smooth. You may want to add more mayo, mustard and/or relish per your taste.
4~Spoon in yolk mixture back into whites of egg halves
5~Dust top of eggs with paprika
6~Refrigerate and serve cold.

~Made by: Holly

Candied-Bacon Sweet Potato Souffle


It may not look like much in this photo, but this is truly an amazing and different dish. I am a huge sweet potato fan. I lived out in Arkansas for about 4 1/2 years and 3 of those years, I lived with my grandmother who was also a big sweet potato fan. She made them often with dinner for us and I learned a lot about different ways to cook them. There's the traditional sweet potato casserole topped with marshmellows that most people have at Thanksgiving. However, Jason decided we needed bacon somewhere on the menu. I came across a recipe for a candied-bacon sweet potato casserole, but when it came down to this Thanksgiving week, I could not find the recipe anywhere! So, I have made it up. I'm combining a sweet potato souffle and putting the candied-bacon in it, on top of it, and even in between the souffle and topping itself. I hope you enjoy it and make it too one day because it sure is amazing! The candied-bacon alone is super easy and addicting - so be careful if you want to watch your waist-line! :) The recipe:


Ingredients for the Souffle:
4-5 medium cooked & mashed sweet potatoes
1 cup sugar
3 eggs, beaten
1/2 cup milk
8 Tbsp. unsalted butter, melted
1 Tbsp. vanilla extract
1/2 Tsp. light salt
4 strips of candied-bacon, chopped
4 strips of candied-bacon, whole

Ingredients for Topping:
1 cup Splenda brown sugar
4 Tbsp. unsalted butter (1/2 stick) cubed at room temperature
1/2 cup self-rise cake flour
4 strips of candied-bacon, chopped

Ingredients for Candied-Bacon:
12 strips of Center Cut Bacon
Splenda Brown Sugar

Make it:
1~ Preheat oven to 400 degrees while you prepare the bacon; (I like to use center cut) and cook the sweet potatoes to prepare them to mash.

Peel and cut in half each sweet potato;
Cover in salted water and bring to a boil until soft; drain and mash;

Place wire rack on cookie sheet; make sure to spray rack well with Buttery Pam Spray
Roll/smear brown splenda sugar on both sides of 12 strips of bacon;
Place strips of bacon on wire rack;
Cook for 8 mins.;
Remove from oven and completely cool;

2~ Keeping oven at 400 degrees; lightly grease 8 inch baking dish;
In a large bowl combine mashed sweet potatoes, sugar, egg, milk, butter, vanilla extract, and salt; once combined, chop 4 strips of candied bacon and put into mixture. Pour into the baking dish;
3~Place 4 whole strips of candied- bacon across top of souffle;

4~In a separate bowl combine all ingredients for the topping and pour over sweet potato souffle and whole strips of candied-bacon in baking dish.

5~ Bake 20-25 minutes, until golden brown on top.

Enjoy!

~Created and Made by: Holly

Corn Casserole


I think this is the easiest recipe anyone could ever make for a casserole. If you love corn, then you'll love this tasty, easy recipe for a casserole! So without any further chit-chat, here's the recipe:

Ingredients:
1/2 cup butter, melted
2 eggs, beaten
1 (8.5oz) pkg. dry corn bread mix
1 (15oz) can of whole kernel corn, drained
1 (14.75oz) can of cream corn
1 cup of sour cream

Make it:
Preheat oven to 350 degrees;
Lightly grease 9x9 inch dish;
Combine all ingredients above;
Bake 45 minutes or till golden brown on top.

See, now wasn't that easy?!

~Made by: Holly

Wednesday, November 24, 2010

Cranberry Sauce

I LOVE cranberry sauce. It's an obsession almost. I can't live without it at Thanksgiving. I'm big on just buying the sauce that comes out shaped like the can, but this year I'm making it from scratch. I like that this is another dish I can make ahead of time. I'm never been a big fan of the berries in the sauce so I always got the smooth stuff in the can, but WOW! I will NEVER buy the canned stuff again! DE-LIC-OUS! Thanks Fiona for sharing your wisdom! So here's the recipe:

Ingredients:
1 cup water
1 cup sugar
Bag of cranberries
3 Cinnamon Sticks
1 large orange

Make it:
In sauce pan, dissolve over medium heat, 1 cup sugar in 1 cup of water;
Bring to boil to make a simple syrup;
Add bag of cranberries;
Cook till they "pop" (about 8-10 minutes);
While it's boiling down squeeze half of fresh orange juices into sauce;
Cut up rest of orange and place whole slices into the sauce along with cinnamon sticks;
Once it's boiled down (additional 5 mins. after cranberries "popped" and look soft, remove from
heat; Remove orange slices and cinnamon sticks with tongs.

Then you can transfer cranberry sauce into your container of choice, cool completely before covering and placing in refrigerator.

The cranberry sauce will gel up in fridge over night - and/or - for a couple of days.

~Made by: Holly
~Recipe from: Fiona Bowden

Swirled Pumpkin Cheesecake


I decided to start with dessert for the Thanksgiving preparation! This cheesecake you can make up to 2 days in advance if you would like. So it's completely ideal that I made it tonight and it to be firming up in the fridge until it's time to indulge tomorrow afternoon! I'm pretty excited about this new dessert. Some people call me crazy because I just don't care for the taste of regular pumpkin pie. At first I thought it was because I just hadn't tried a good one, but after trying them for years now, I just don't like them. HOWEVER, combined in a cheesecake?! Now that sounds like something I could handle! And boy, oh boy am I excited because it taste AMAZING!!! Apparently, I didn't have a 9 inch. pie plate because I had some filling left over, but I made a crust-less cheesecake in a mini meatloaf foil pan!


If the mini version taste as good as the main one I created tonight....I don't even know what to say besides YUM-O. I can not wait to try it with the home-made gingersnap crust. So here we go - recipe time!

Ingredients for crust:
24 Gingersnap Cookies (you can also add 1/2 cup pecans, but I just forgot to get some)
2 Tbsp. sugar
3 Tbsp. unsalted butter, melted

Ingredients for filling:
3/4 cup sugar
2 pkg (8 oz. each) cream cheese, softened
2 large eggs
1/4 cup milk
2 Tbsp. flour
1/4 tsp. kosher salt
1 cup pure pumpkin (NOT pumpkin pie filling), from 15-oz. can
1 tsp. pumpkin pie spice

Make It:
1~ Crust: Heat Oven 350 degrees
If you don't have a food processor, a regular mixer works fine.

Pulse gingersnap cookies (and pecans if you like) until finely ground;
Add sugar;
Add butter and pulse to combine;
Press mixture evenly into bottom and up the sides of a 9-inch pie plate.

*I found if you just pour your crust mixture into your pie plate, shake plate and then push buttery crumbs up around the sides of the pie plate to create thick border of crust around sides, then flatten the rest of the crust to the bottom of the pan is the best way.

Bake crust for 10-12 minutes

2 ~ Filling:
Pulse together sugar and cream cheese until combined;
Scrape down sides and add eggs, milk, flour, and salt; process until smooth;
Save 1/3 cup of filling off to side;
Add pumpkin and pumpkin pie spice to rest of the filling until fully incorporated;
Scrape mixture into the baked crust (no need to cool crust);
Spoon the reserved cream cheese mixture over top and use a knife to swirl.

3~ Bake until the center is set but still trembles, 30-35 minutes.

4~ Let cool completely, then refrigerate until chilled, at least 2 hours or up to 2 days.

~Made by: Holly

Thanksgiving 2010 Has Arrived!

I am VERY excited about Thanksgiving tomorrow. It's one of my favorite holidays that I look forward to participating in some way each year. This year I will be spending it with my husband, Jason, and his family: mom, dad, and brother along with my mom and sister. Jason, his mom, and I are all splitting up cooking duties this year. I just put in my first pie of the night and the cooking continues....so stay tuned for more deliciousness coming your way! I will be taking photos and posting recipes of things Jason and I make this evening before the big day and will take more photos tomorrow. To get your mouth's watering - here's what's on the menu:

Appetizers:
Deviled Eggs
Shrimp Cocktail
Sausage Balls

Main Course & Sides:
Turkey
Giblet Gravy
Dressing
Cranberry Sauce
Ham
Ham Sauce
Baked Beans
Green Bean Casserole
Corn Casserole
Candied-Bacon Sweet Potato Souffle
Potatoes Au Gratin
Roasted Veggies
Potato Cheddar Chive Rolls

Desserts:
Swirled Pumpkin Cheesecake
Lemon Meringue Pie
Pecan Pie
Apple Crisp

Stay tuned!
~Holly

Sunday, October 24, 2010

My Version of Swedish Meatballs

We've had A LOT going on in our lives since June and realize it's time to put up some new stuff and get back to work on the site. One of Jason's favorite dishes is Swedish Meatballs and I've been holding out on him making it from scratch...so to celebrate our 2 year wedding anniversary a couple of weeks ago, I made it for dinner. It turned out AMAZING, however, I forgot to take a photo! So you'll just have to trust me and cook it up and enjoy in the feast of amazing-ness!

Ingredients:
1 package of Egg Noodles
3/4lb ground beef
1/2lb ground pork
1/2 cup minced onions
3/4 cup fine bread crumbs (I used Italian Style)
1 tbsp. minced parsley
1 tsp. salt
1/8 tsp. pepper
1/2 tsp. garlic powder
1 tbsp. worcestershire sauce
1 egg
1/2 cup milk
2 tbsp. canola oil

Gravy Ingredients:
1/4 cup flour
1/4 tsp. salt
1/4 tsp. garlic powder
1/8 tsp. pepper
1 tsp. paprika
2 cups boiling water
3/4 cup sour cream

Make It:

1.) Make egg noodles according to package. When done, put to side; make sure to EVOO the noodles so they don't stick while you fix the rest.

2.) Combine meats, onions, bread crumbs, parsley, salt, pepper, garlic powder, worcestershire, egg and milk.

3.) Shape into balls the size of a walnut (I like to use an ice cream scoop so they are all the same), brown meatballs in oil in a skillet, reserve drippings, place meatballs in an oven proof skillet when browned.

4.) Stir flour, salt, garlic powder, pepper, paprika into the hot drippings left over from the meatballs; stir in boiling water and sour cream. Pour gravy over meatballs in oven proof skillet, and add egg noodles.

5.) Bake in oven at 375 degrees for 10-15 minutes and Voila!

~Made by: Holly